雁渡寒潭 风吹疏竹

教练,我想打篮球


  • Home

  • Tags

  • Categories

  • Archives

hadoop的安全机制和审计

Posted on 2017-06-01 | In Hadoop |

Hadoop的安全机制

Hadoop安全机制介绍

Hadoop安全机制现状
Hadoop 一直缺乏安全机制,主要表现在以下几个方面:

(1) User to Service

[1] Namenode或者jobtracker缺乏安全认证机制 Client的用户名和用户组名由自己指定。

[2] DataNode缺乏安全授权机制
用户只要知道某个block的blockID,便可以绕过namenode直接从datanode上读取该block;用户可以向任意datanode上写block。

[3] JobTracker缺乏安全授权机制
用户可以修改或者杀掉任意其他用户的作业;用户可以修改JobTracker的持久化状态。

(2) Service to service安全认证
Datanode与TaskTracker缺乏安全授权机制,这使得用户可以随意启动假的datanode和tasktracker,如:你可以直接到已经启动的某个TaskTracker上启动另外一个tasktracker:
./hadoop-daemon.sh start datanode

(3)磁盘或者通信连接没有经过加密

Hadoop Kerberos安全机制介绍

Hadoop 2.0 (YARN)中的安全机制概述

一般而言,系统安全机制由认证(authentication)和授权(authorization)两大部分构成。认证就是简单地对一个实体的身份进行判断;而授权则是向实体授予对数据资源和信息访问权限的决策过程。同Hadoop 1.0一样,Hadoop 2.0中的认证机制采用Kerbero和Token两种方案,而授权则是通过引入访问控制列表(Access Control List,ACL)实现的。

Hadoop 2.0授权机制

  • 队列访问控制列表,例如提交程序和管理程序
  • 应用程序访问控制列表
  • 服务访问控制列表,例如查看和修改app

Hadoop的安全管理

Hadoop生态安全管理框架Apache Ranger

Ranger是一个框架,用于Hadoop平台上的监控和全面的数据安全管理。

Apache Ranger有以下目标:

  • 集中安全管理,在中央UI中或使用REST API来管理所有与安全相关的任务。
  • 使用Hadoop组件/工具执行特定行为(或操作)并通过中央管理工具来进行细粒度的授权管理。
  • 标准化所有Hadoop组件的授权方法。
  • 增强对不同授权方法的支持 如:基于角色的访问控制,基于属性的访问控制等。
  • 在Hadoop的所有组件中集中审核用户访问和(与安全相关的)管理操作。

Ranger的功能还包括动态策略(Dynamic Policies),当访问依赖于时间等动态因素时。它可以基于每天的不同时刻、IP地址或是地理位置对访问资源进行限制。

对于受支持的Hadoop组件,Ranger通过访问控制策略提供了一种标准的授权方法。作为标准,Ranger提供了一种集中式的组件,用于审计用户的访问行为和管理组件间的安全交互行为。

Ranger使用了一种基于属性的方法定义和强制实施安全策略。当与Apache Hadoop的数据治理解决方案和元数据仓储组件Apache Atlas一起使用时,它可以定义一种基于标签的安全服务,通过使用标签对文件和数据资产进行分类,并控制用户和用户组对一系列标签的访问。Ranger的功能还包括动态策略(Dynamic Policies),当访问依赖于时间等动态因素时。它可以基于每天的不同时刻、IP地址或是地理位置对访问资源进行限制。

参考:
Apache Ranger在HDFS中的最佳实践

WebUI保护

Apache Knox Gateway是一个用于hadoop安全的RESTful API Gateway,为Spark/Hadoop集群提供唯一的REST入口。Knox以类似防火墙的形式挡在Spark集群之前,接管所有用户请求(如WEB UI访问、HDFS内容查看、Hive/HBase数据操作等)。从拓扑上来说这种做法更清爽(相对Kerberos),但对内部集群的保护要求很高,因为一旦攻破了Knox层,不管资源还是数据都是光着屁股的。

Spark、HDFS等等都提供了Story Web UI,用户可以从Web上查看当前JOB的执行情况,也可以kill掉JOB。那么这个Web UI不应该所有人都可以访问,而应该只开放给管理员使用。默认Spark没有认证,能连接到这个集群上就可以访问Web UI,但通过Knox,可以在打开Web UI的时候先做认证,限制只有某些用户可以访问。 类似的,Knox还可以保护HDFS NN UI、Yarn UI等

Hive Metadata存MySQL注释中文乱码的问题

Posted on 2017-05-26 | In Hive |

参考: http://gengqi88.iteye.com/blog/2040422

解决方案:数据库编码为latin1.将一下表的字段(涉及注释的字段都改)编码设定为UTF8
1、然后进入数据库执行以下5条SQL语句:
(1)修改表字段注解和表注解

1
2
alter table COLUMNS_V2 modify column COMMENT varchar(256) character set utf8;
alter table TABLE_PARAMS modify column PARAM_VALUE varchar(4000) character set utf8;

(2) 修改分区字段注解:

1
2
alter table PARTITION_PARAMS  modify column PARAM_VALUE varchar(4000) character set utf8 ; 
alter table PARTITION_KEYS modify column PKEY_COMMENT varchar(4000) character set utf8;

(3)修改索引注解:

1
2
3
4
5
6
7
8
9
alter table  INDEX_PARAMS  modify column PARAM_VALUE  varchar(4000) character set utf8;
```
2、修改hive连接mysql的连接为utf-8
``` xml
<property>
<name></name>
<value>jdbc:mysql://IP:3306/hive?createDatabaseIfNotExist=true&amp;characterEncoding=UTF-8</value>
<description>JDBC connect string for a JDBC metastore</description>
</property>

另参考:
https://my.oschina.net/jackieyeah/blog/742088
http://www.crazyant.net/1193.html

Scala隐式转换和隐式参数

Posted on 2017-05-15 | In Scala |

前言

Scala的implicit功能很强大,可以自动地给对象”添加一个属性”。 这里打上引号的原因是Scala内部进行编译的时候会自动加上隐式转换函数。

很多Scala开源框架内部都大量使用了implicit。因为implicit真的很强大,写得好的implicit可以让代码更优雅。但个人感觉implicit也有一些缺点,比如使用了implicit之后,看源码或者使用一些library的时候无法下手,因为你根本不知道作者哪里写了implicit。这个也会对初学者造成一些困扰。

比如Scala中Option就有一个implicit可以将Option转换成Iterable:

1
2
3
4
5
6
val list = List(1, 2)
val map = Map(1 -> 11, 2 -> 22, 3 -> 33)

val newList = list.flatMap {
num => map.get(num) // map.get方法返回的是Option,可以被隐式转换成Iterable
}

以下是implicit的一个小例子。

比如以下一个例子,定义一个Int类型的变量num,但是赋值给了一个Double类型的数值。这时候就会编译错误:

1
val num: Int = 3.5 // Compile Error

但是我们加了一个隐式转换之后,就没问题了:

1
2
3
implicit def double2Int(d: Double) = d.toInt

val num: Int = 3.5 // 3, 这段代码会被编译成 val num: Int = double2Int(3.5)

隐式转换规则

标记规则(Marking Rule)

任何变量,函数或者对象都可以用implicit这个关键字进行标记,表示可以进行隐式转换。

1
implicit def intToString(x: Int) = x.toString

编译器可能会将x + y 转换成 convert(x) + y 如果convert被标记成implicit。
同样只有哪些使用 implicit 关键字的定义才是可以使用的隐式定义。关键字 implicit 用来标记一个隐式定义。编译器才可以选择它作为隐式变化的候选项。你可以使用 implicit 来标记任意变量,函数或是对象。

作用域规则(Scope Rule)

在一个作用域内,一个隐式转换必须是一个唯一的标识。

比如说MyUtils这个object里有很多隐式转换。x + y 不会使用MyUtils里的隐式转换。 除非import进来。 import MyUtils._

Scala编译器还能在companion class中去找companion object中定义的隐式转换。

1
2
3
4
5
6
7
8
9
10
11
12
object Player {
implicit def getClub(player: Player): Club = Club(player.clubName)
}

class Player(val name: String, val age: Int, val clubName: String) {

}

val p = new Player("costa", 27, "Chelsea")

println(p.welcome) // Chelsea welcome you here!
println(p.playerNum) // 21

一次编译只隐式转换一次(One-at-a-time Rule)

Scala不会把 x + y 转换成 convert1(convert2(x)) + y

隐式转换类型

隐式转换成正确的类型

这种类型是Scala编译器对隐式转换的第一选择。 比如说编译器看到一个类型的X的数据,但是需要一个类型为Y的数据,那么就会去找把X类型转换成Y类型的隐式转换。

本文一开始的double2Int方法就是这种类型的隐式转换。

1
2
3
implicit def double2Int(d: Double) = d.toInt

val num: Int = 3.5 // 3

当编译器发现变量num是个Int类型,并且用Double类型给它赋值的时候,会报错。 但是在报错之前,编译器会查找Double => Int的隐式转换。然后发现了double2Int这个隐式转换函数。于是就使用了隐式转换。

方法调用的隐式转换

比如这段代码 obj.doSomeThing。 比如obj对象没有doSomeThing这个方法,编译器会会去查找拥有doSomeThing方法的类型,并且看obj类型是否有隐式转换成有doSomeThing类型的函数。有的话就是将obj对象隐式转换成拥有doSomeThing方法的对象。

以下是一个例子:

1
2
3
4
5
6
7
8
9
10
11
12
case class Person(name: String, age: Int) {
def +(num: Int) = age + num
def +(p: Person) = age + p.age
}

val person = Person("format", 99)
println(person + 1) // 100
// println(1 + person) 报错,因为Int的+方法没有有Person参数的重载方法

implicit def personAddAge(x: Int) = Person("unknown", x)

println(1 + person) // 100

**
有了隐式转换方法之后,编译器检查 1 + person 表达式,发现Int的+方法没有有Person参数的重载方法。在放弃之前查看是否有将Int类型的对象转换成以Person为参数的+方法的隐式转换函数,于是找到了,然后就进行了隐式转换。

Scala的Predef中也使用了方法调用的隐式转换。

Map(1 -> 11, 2 -> 22)
上面这段Map中的参数是个二元元组。 Int没有 -> 方法。 但是在Predef中定义了:

implicit final class ArrowAssocA extends AnyVal {
@inline def -> B: Tuple2[A, B] = Tuple2(self, y)
def →B: Tuple2[A, B] = ->(y)
}

隐式参数

隐式参数的意义是当方法需要多个参数的时候,可以定义一些隐式参数,这些隐式参数可以被自动加到方法填充的参数里,而不必手填充。

1
2
3
4
5
6
7
8
9
10
11
12
def implicitParamFunc(name: String)(implicit tiger: Tiger, lion: Lion): Unit = {
println(name + " have a tiget and a lion, their names are: " + tiger.name + ", " + lion.name)
}

object Zoo {
implicit val tiger = Tiger("tiger1")
implicit val lion = Lion("lion1")
}

import Zoo._

implicitParamFunc("format")

上面这个代码中implicitParamFunc中的第二个参数定义成了隐式参数。

然后在Zoo对象里定义了两个隐式变量,import进来之后,调用implicitParamFunc方法的时候这两个变量被自动填充到了参数里。

这里需要注意的是不仅仅方法中的参数需要被定义成隐式参数,对应的隐式参数的变量也需要被定义成隐式变量。

其他

对象中的隐式转换可以只import自己需要的。

object MyUtils {
implicit def a …
implicit def b …
}

import MyUtils.a
隐式转换修饰符implicit可以修饰class,method,变量,object。

修饰方法和变量的隐式转换本文已经介绍过,就不继续说了。

修饰class的隐式转换,它的作用跟修饰method的隐式转换类似:

implicit class RangeMarker(val start: Int) {
def –>(end: Int) = start to end
}

1 –> 10 // Range(1, 10)
上段代码可以改造成使用Value Class完成类的隐式转换:

implicit class RangeMaker(start: Int) extends AnyVal {
def –>(end: Int) = start to end
}
修饰object的隐式转换:

1
2
3
4
5
6
7
8
9
10
11
12
13
14
15
16
17
18
trait Calculate[T] {
def add(x: T, y: T): T
}

implicit object IntCal extends Calculate[Int] {
def add(x: Int, y: Int): Int = x + y
}

implicit object ListCal extends Calculate[List[Int]] {
def add(x: List[Int], y: List[Int]): List[Int] = x ::: y
}

def implicitObjMethod[T](x: T, y: T)(implicit cal: Calculate[T]): Unit = {
println(x + " + " + y + " = " + cal.add(x, y))
}

implicitObjMethod(1, 2) // 1 + 2 = 3
implicitObjMethod(List(1, 2), List(3, 4)) // List(1, 2) + List(3, 4) = List(1, 2, 3, 4)

Spark如何处理异常

Posted on 2017-05-12 | In Spark |

异步执行和异常处理

Spark使用RDD作为基本单元来构建基于大量数据的算法.

在RDD上你有两个操作:转换 transformation和行动 actions.转换操作会通过前一个RDD构建一个新的RDD.比如map和flatMap.

1
2
val lines:RDD[String]=sc.textFile("large_file.txt")
val tokens = lines.flatMap(_ split " ")

而行动操作则基于RDD计算结果出来.然后返回给驱动程序或者保存到外部的存储系统(HDFS,HBase)等

1
tokens.saveAsTextFile("/some/uotput/file.txt")

最后,关于RDD, 你需要记住:

you can define new RDDs any time, Spark computes them only in a lazy fashion —that is, the first time they are used in an action. ```
1
2
3
4
5
6
7
8
9
10
11
12
13

在RDD上处理转换操作的时候, 可能会出错和抛出异常.通常的处理方法就是把转换操作用try-catch包裹起来
``` scala
val lines: RDD[String] = sc.textFile("large_file.txt")
try {
val tokens = lines.flatMap(_ split " ")
// This transformation can throw an exception
.map(s => s(10))
} catch {
case e : StringIndexOutOfBoundsException =>
// Doing something in response of the exception
}
tokens.saveAsTextFile("/some/output/file.txt")

不幸的是, 转换里的代码直到第一次行动 执行时才会真的执行.也就是说上面的处理异常的代码是完全无用的.我们能做的也就只能时把行动 操作用try-catch包裹起来

1
2
3
4
5
6
7
8
9
10
11
12
val lines: RDD[String] = sc.textFile("large_file.txt")
val tokens =
lines.flatMap(_ split " ")
.map(s => s(10))
try {
// This try-catch block catch all the exceptions thrown by the
// preceding transformations.
tokens.saveAsTextFile("/some/output/file.txt")
} catch {
case e : StringIndexOutOfBoundsException =>
// Doing something in response of the exception
}

你可以看到,我们丢失了异常处理的位置

使用这种方法,我们会丢失抛出异常的元素.此外,Spark是用来处理大量数据的:我们能确定我们的目的就是仅仅因为一个RDD里一个元素的错误就要阻塞整个执行过程吗?

函数式编程和异常处理

第二种处理方法则是将try-catch移动到转换 操作中. 以上代码变为:

val tokens =
lines.flatMap(_ split “ “)
.map {
s => try {
s(10)
} catch {
case e : StringIndexOutOfBoundsException =>
// What the hell can we return in this case?
}
} // end of map
通过这么做,我们重新获得了位置 特征! 但是,通过这种方法,我们又引入了另一个问题.先前说过: 一个转换操作从旧的RDD里构建了一个新的RDD.转换操作map的偏函数输入的原始类型是String=>Char

为了保留这个特征,我们不得不在case语句中返回一个Char或他的子类型.我们该怎么选择?空的字符?一个特殊的字符? 这些选择显然迟早会造成其他的问题.
对于Spark Transformation算子中的异常处理,直接写try catch会导致需要添加很多额外的代码。

1
2
3
4
5
6
7
8
9
10
11
12
val data = Seq("123", "12aa")
val dataRDD = sc.parallelize(data)

val intRDD = dataRDD.map {
item =>
try {
item.toInt
} catch {
case e: NumberFormatException =>
0
}
}.collect()

1
2
3
4
5
val anotherRDD = dataRDD.map {
item =>
Try(item.toInt)
}.filter(_.isSuccess).collect()
anotherRDD.foreach(println)

谈谈Spark的计算本地性

Posted on 2017-05-04 | In Spark |

转载:http://coolplayer.net/2017/05/02/%E8%B0%88%E8%B0%88spark-%E7%9A%84%E8%AE%A1%E7%AE%97%E6%9C%AC%E5%9C%B0%E6%80%A7

Spark 是计算追着数据走, Storm 是数据追着计算走, 所以如果数据量比较小,要求延迟比较小, 就适合storm, 但是如果数据量比较大, 这个时候如果传输数据, 就会碰到很大的带宽占用和性能下降, 这个时候就比较适合让计算去找数据.

但是在计算找数据的过程中, 是怎么让计算找到数据呢, 这个就是这篇文章谈的, spark 的计算本地性

不同的 Locality Level

  • PROCESS_LOCAL: 数据和 task 在同一个executor jvm 中,最好的就是这种 locality。
  • NODE_LOCAL: 数据在同一个节点上。比如数据在同一个节点的另一个 executor上;或在 HDFS 上,恰好有 block 在同一个节点上。速度比 PROCESS_LOCAL 稍慢,因为数据需要在不同进程之间传递或从文件中读取
  • NO_PREF: 数据从哪里访问都一样快,不需要位置优先
  • RACK_LOCAL: 数据在同一机架的不同节点上。需要通过网络传输数据及文件 IO,比 NODE_LOCAL 慢
  • ANY: 数据在非同一机架的网络上,速度最慢

Task 自己想在哪里执行

我们来看下 task 自己想在哪里执行, 这要根据 task 处理的数据是否缓存, task 的数据所在的 host 和 rack来判断, 在 DAGScheduler 中, 每个分区每个 stage 会成为一个task, 每个 task 会根据自己分区的数据的情况,进行判断自己的 本地性Level,

getPreferredLocs -> getPreferredLocsInternal

函数中, 会先判断是否rdd 本分区的数据是否已经缓存在 blockManager, 如果已经缓存, 获取到数据所在的 host 和 executorId, 然后设置本 task 的数据本地性 Level 为 PROCESS_LOCAL, 偏好某个 host 上的某个 executor 去执行,

如果没有缓存, 那么就不能是PROCESS_LOCAL , 最多也就是个 NODE_LOCAL,会根据不同的RDD类型,来调用具体的 getPreferredLocations 来判断数据本地性 Level, 和数据本地性偏好

假如这里是HadoopRDD, 那么每个 task 处理的数据就是一个 HadoopPartition, 其实代表 hdfs 中的一份数据 InputSplit, 它定义了分割的长度及位置。分割长度 是指分割数据的大小(以字节为单位),而分割位置 是分割所在的机器结点名称组成的列表, 分割位置中就能获取到 数据所在的 host 和 rack,

如果数据源头是 kafka, 那么每个 task 处理的数据就是 KafkaRDDPartition, 其实对应每一个topic的每一个partition, preferredHosts 中记录着每个 topic 中每个 partition 所在的 host, 就直接可以当做 偏好的 host, 如果kafka中broker和Spark在同一个集群中,此时getPreferredLocations获取本地性就可以极大提高效率,因为没有了数据网络传输的成本。

以上两种都偏好某个 host 去执行

这里需要注意的是,这里找的数据源头是 rdd的顺着窄依赖, 往上找父依赖, 直到找到第一个窄依赖, 也就找到了数据读取源头, 来决定数据本地性

如果读取的是 shuffle 的数据, 就不用考虑那么多了, 因为shuffle中的read task 是需要去所有的write task的disk上拉取数据的。

怎么能最大程度的满足 task 的本地性

我们都知道, 数据传输对内网带宽和性能有极大的损耗,所以要千方百计的最大程度的满足 更高级别的本地性,从优到差排, PROCESS_LOCAL > NODE_LOCAL > NO_PREF > RACK_LOCAL

所以spark 调度的总体原则就是总是尝试以最高的 locality level 去启动task, 如果对应需要是用到的 executor 正在使用中(跑别的task),满足不了, 就等一会(等待时间是有spark.locality.wait.process或spark.locality.wait.node或spark.locality.wait.rack来控制的), 看看过一会这个忙线的host 或者 executor是不是解脱了, 如果已经空闲了,我就可以把 task 放在它最期望的 host 或者 executor 上去运行了, 这里赌的就是一般来说,task 执行耗时相对于网络传输/文件IO 要小得多,调度器多等待1 2秒可能就可以以更好的本地性执行 task,避免了更耗时的网络传输或文件IO, 也是极棒的。

Spark的延迟调度

我们来看下 spark 的延迟调度的策略,

有时候 task 自己偏好某个 executor 中,

可以看下面的图直观理解一下

所以spark 调度的总体原则就是总是尝试以最高的 locality level 去启动task,
我举个例子, 假如 一个 task 要处理的数据,在上一个 stage 中缓存下来了, 这个 task 期望的 就是以 PROCESS_LOCAL 来运行, 这个时候缓存数据的executor 不巧正在执行 其他的task, 那么我就等一会, 等多长时间呢, spark.locality.wait.process这么长时间, 如果时间超了, executor 还是没有空闲下来, 那么我没有办法, 我就以NODE_LOCAL 来运行 task, 这个时候我想到 同一台机器上其他 executor 上跨jvm 去拉取数据, 如果同一台机器上有其他空闲的 executor 可以满足, 就这么干, 如果没有, 等待 spark.locality.wait.node 时间, 还没有就以更低的 Locality Level 去执行这个 task。

如何重构箭头型代码

Posted on 2017-04-13 | In 重构 |

转载自: http://coolshell.cn/articles/17757.html?hmsr=toutiao.io&utm_medium=toutiao.io&utm_source=toutiao.io

本文主要起因是,一次在微博上和朋友关于嵌套好几层的if-else语句的代码重构的讨论,在微博上大家有各式各样的问题和想法。按道理来说这些都是编程的基本功,似乎不太值得写一篇文章,不过我觉得很多东西可以从一个简单的东西出发,到达本质,所以,我觉得有必要在这里写一篇的文章。不一定全对,只希望得到更多的讨论,因为有了更深入的讨论才能进步。

文章有点长,我在文章最后会给出相关的思考和总结陈词,你可以跳到结尾。

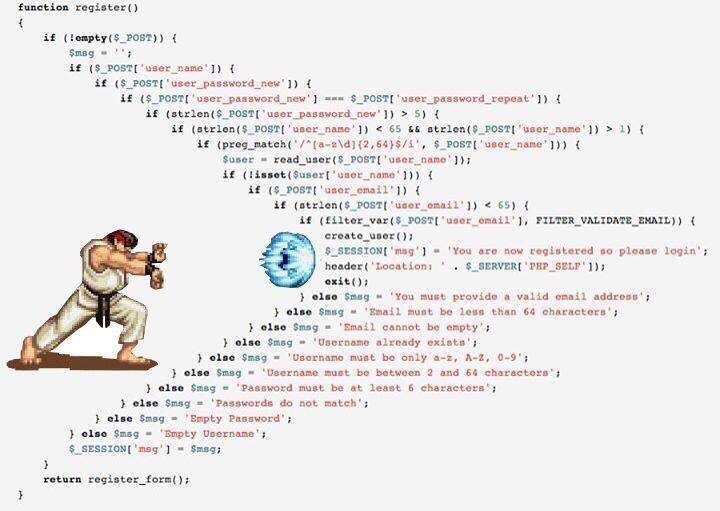
所谓箭头型代码,基本上来说就是下面这个图片所示的情况。

那么,这样“箭头型”的代码有什么问题呢?看上去也挺好看的,有对称美。但是……

关于箭头型代码的问题有如下几个:

1)我的显示器不够宽,箭头型代码缩进太狠了,需要我来回拉水平滚动条,这让我在读代码的时候,相当的不舒服。

2)除了宽度外还有长度,有的代码的

1
2
3
4
5
6
7
8
9
10
11
12
13
14
15
16
17
18
19
20
21
22
23
24
25
26
27
28

总而言之,**“箭头型代码”如果嵌套太多,代码太长的话,会相当容易让维护代码的人(包括自己)迷失在代码中,因为看到最内层的代码时,你已经不知道前面的那一层一层的条件判断是什么样的,代码是怎么运行到这里的,所以,箭头型代码是非常难以维护和Debug的**。

## 微博上的案例 与 Guard Clauses
OK,我们先来看一下微博上的那个示例,代码量如果再大一点,嵌套再多一点,你很容易会在条件中迷失掉(下面这个示例只是那个“大箭头”下的一个小箭头)
``` java
FOREACH(Ptr<WfExpression>, argument, node->arguments) {
int index = manager->expressionResolvings.Keys().IndexOf(argument.Obj());
if (index != -1) {
auto type = manager->expressionResolvings.Values()[index].type;
if (! types.Contains(type.Obj())) {
types.Add(type.Obj());
if (auto group = type->GetTypeDescriptor()->GetMethodGroupByName(L"CastResult", true)) {
int count = group->GetMethodCount();
for (int i = 0; i < count; i++) { auto method = group->GetMethod(i);
if (method->IsStatic()) {
if (method->GetParameterCount() == 1 &&
method->GetParameter(0)->GetType()->GetTypeDescriptor() == description::GetTypeDescriptor<DescriptableObject>() &&
method->GetReturn()->GetTypeDescriptor() != description::GetTypeDescriptor<void>() ) {
symbol->typeInfo = CopyTypeInfo(method->GetReturn());
break;
}
}
}
}
}
}
}

上面这段代码,可以把条件反过来写,然后就可以把箭头型的代码解掉了,重构的代码如下所示:

1
2
3
4
5
6
7
8
9
10
11
12
13
14
15
16
17
18
19
20
21
22
23
24
FOREACH(Ptr<WfExpression>, argument, node->arguments) {
int index = manager->expressionResolvings.Keys().IndexOf(argument.Obj());
if (index == -1) continue;

auto type = manager->expressionResolvings.Values()[index].type;
if ( types.Contains(type.Obj())) continue;

types.Add(type.Obj());

auto group = type->GetTypeDescriptor()->GetMethodGroupByName(L"CastResult", true);
if ( ! group ) continue;

int count = group->GetMethodCount();
for (int i = 0; i < count; i++) { auto method = group->GetMethod(i);
if (! method->IsStatic()) continue;

if ( method->GetParameterCount() == 1 &&
method->GetParameter(0)->GetType()->GetTypeDescriptor() == description::GetTypeDescriptor<DescriptableObject>() &&
method->GetReturn()->GetTypeDescriptor() != description::GetTypeDescriptor<void>() ) {
symbol->typeInfo = CopyTypeInfo(method->GetReturn());
break;
}
}
}

这种代码的重构方式叫 Guard Clauses

Martin Fowler 的 Refactoring 的网站上有相应的说明《Replace Nested Conditional with Guard Clauses》。
Coding Horror 上也有一篇文章讲了这种重构的方式 —— 《Flattening Arrow Code》
StackOverflow 上也有相关的问题说了这种方式 —— 《Refactor nested IF statement for clarity》
这里的思路其实就是,让出错的代码先返回,前面把所有的错误判断全判断掉,然后就剩下的就是正常的代码了。

抽取成函数

微博上有些人说,continue 语句破坏了阅读代码的通畅,我觉得他们一定没有好好读这里面的代码,其实,我们可以看到,所有的 if 语句都是在判断是否出错的情况,所以,在维护代码的时候,你可以完全不理会这些 if 语句,因为都是出错处理的,而剩下的代码都是正常的功能代码,反而更容易阅读了。当然,一定有不是上面代码里的这种情况,那么,不用continue ,我们还能不能重构呢?

当然可以,抽成函数:

1
2
3
4
5
6
7
8
9
10
11
12
13
14
15
16
17
18
19
20
21
22
23
24
25
26
27
28
29
30
31
32
33
34
35
36
37
38
39
bool CopyMethodTypeInfo(auto &method, auto &group, auto &symbol) 
{
if (! method->IsStatic()) {
return true;
}
if ( method->GetParameterCount() == 1 &&
method->GetParameter(0)->GetType()->GetTypeDescriptor() == description::GetTypeDescriptor<DescriptableObject>() &&
method->GetReturn()->GetTypeDescriptor() != description::GetTypeDescriptor<void>() ) {
symbol->typeInfo = CopyTypeInfo(method->GetReturn());
return false;
}
return true;
}

void ExpressionResolvings(auto &manager, auto &argument, auto &symbol)
{
int index = manager->expressionResolvings.Keys().IndexOf(argument.Obj());
if (index == -1) return;

auto type = manager->expressionResolvings.Values()[index].type;
if ( types.Contains(type.Obj())) return;

types.Add(type.Obj());
auto group = type->GetTypeDescriptor()->GetMethodGroupByName(L"CastResult", true);
if ( ! group ) return;

int count = group->GetMethodCount();
for (int i = 0; i < count; i++) { auto method = group->GetMethod(i);
if ( ! CopyMethodTypeInfo(method, group, symbol) ) break;
}
}

...
...
FOREACH(Ptr<WfExpression>, argument, node->arguments) {
ExpressionResolvings(manager, arguments, symbol)
}
...
...

你发出现,抽成函数后,代码比之前变得更容易读和更容易维护了。不是吗?

有人说:“如果代码不共享,就不要抽取成函数!”,持有这个观点的人太死读书了。函数是代码的封装或是抽象,并不一定用来作代码共享使用,函数用于屏蔽细节,让其它代码耦合于接口而不是细节实现,这会让我们的代码更为简单,简单的东西都能让人易读也易维护。这才是函数的作用。

嵌套的 if 外的代码

微博上还有人问,原来的代码如果在各个 if 语句后还有要执行的代码,那么应该如何重构。比如下面这样的代码。

原版

1
2
3
4
5
6
7
8
9
10
11
12
13
14
15
for(....) {
do_before_cond1()
if (cond1) {
do_before_cond2();
if (cond2) {
do_before_cond3();
if (cond3) {
do_something();
}
do_after_cond3();
}
do_after_cond2();
}
do_after_cond1();
}

上面这段代码中的那些 do_after_condX() 是无论条件成功与否都要执行的。所以,我们拉平后的代码如下所示:

重构第一版

1
2
3
4
5
6
7
8
9
10
11
12
13
14
15
16
17
18
19
20
21
22
23
24
for(....) {
do_before_cond1();
if ( !cond1 ) {
do_after_cond1();
continue
}
do_after_cond1();

do_before_cond2();
if ( !cond2 ) {
do_after_cond2();
continue;
}
do_after_cond2();

do_before_cond3();
if ( !cond3 ) {
do_after_cond3();
continue;
}
do_after_cond3();

do_something();
}

你会发现,上面的 do_after_condX 出现了两份。如果 if 语句块中的代码改变了某些do_after_condX依赖的状态,那么这是最终版本。

但是,如果它们之前没有依赖关系的话,根据 DRY 原则,我们就可以只保留一份,那么直接掉到 if 条件前就好了,如下所示:

重构第二版

1
2
3
4
5
6
7
8
9
10
11
12
13
14
15
for(....) {
do_before_cond1();
do_after_cond1();
if ( !cond1 ) continue;

do_before_cond2();
do_after_cond2();
if ( !cond2 ) continue;

do_before_cond3();
do_after_cond3();
if ( !cond3 ) continue;

do_something();
}

此时,你会说,我靠,居然,改变了执行的顺序,把条件放到 do_after_condX() 后面去了。这会不会有问题啊?

其实,你再分析一下之前的代码,你会发现,本来,cond1 是判断 do_before_cond1() 是否出错的,如果有成功了,才会往下执行。而 do_after_cond1() 是无论如何都要执行的。从逻辑上来说,do_after_cond1()其实和do_before_cond1()的执行结果无关,而 cond1 却和是否去执行 do_before_cond2() 相关了。如果我把断行变成下面这样,反而代码逻辑更清楚了。

重构第三版

1
2
3
4
5
6
7
8
9
10
11
12
13
14
15
16
17
18
for(....) {

do_before_cond1();
do_after_cond1();


if ( !cond1 ) continue; // <-- cond1 成了是否做第二个语句块的条件
do_before_cond2();
do_after_cond2();

if ( !cond2 ) continue; // <-- cond2 成了是否做第三个语句块的条件
do_before_cond3();
do_after_cond3();

if ( !cond3 ) continue; //<-- cond3 成了是否做第四个语句块的条件
do_something();

}

于是乎,在未来维护代码的时候,维护人一眼看上去就明白,代码在什么时候会执行到哪里。 这个时候,你会发现,把这些语句块抽成函数,代码会干净的更多,再重构一版:

重构第四版

1
2
3
4
5
6
7
8
9
10
11
12
13
14
15
16
17
18
19
20
21
22
23
24
25
26
27
28
29
30
31
32
33
34
bool do_func3() {
do_before_cond2();
do_after_cond2();
return cond3;
}

bool do_func2() {
do_before_cond2();
do_after_cond2();
return cond2;
}

bool do_func1() {
do_before_cond1();
do_after_cond1();
return cond1;
}

// for-loop 你可以重构成这样
for (...) {
bool cond = do_func1();
if (cond) cond = do_func2();
if (cond) cond = do_func3();
if (cond) do_something();
}

// for-loop 也可以重构成这样
for (...) {
if ( ! do_func1() ) continue;
if ( ! do_func2() ) continue;
if ( ! do_func3() ) continue;

do_something();
}

上面,我给出了两个版本的for-loop,你喜欢哪个?我喜欢第二个。这个时候,因为for-loop里的代码非常简单,就算你不喜欢 continue ,这样的代码阅读成本已经很低了。

状态检查嵌套

接下来,我们再来看另一个示例。下面的代码的伪造了一个场景——把两个人拉到一个一对一的聊天室中,因为要检查双方的状态,所以,代码可能会写成了“箭头型”。

1
2
3
4
5
6
7
8
9
10
11
12
13
14
15
16
17
18
19
20
21
22
23
24
25
26
27
28
29
30
31
32
int ConnectPeer2Peer(Conn *pA, Conn* pB, Manager *manager)
{
if ( pA->isConnected() ) {
manager->Prepare(pA);
if ( pB->isConnected() ) {
manager->Prepare(pB);
if ( manager->ConnectTogther(pA, pB) ) {
pA->Write("connected");
pB->Write("connected");
return S_OK;
}else{
return S_ERROR;
}

}else {
pA->Write("Peer is not Ready, waiting...");
return S_RETRY;
}
}else{
if ( pB->isConnected() ) {
manager->Prepare();
pB->Write("Peer is not Ready, waiting...");
return S_RETRY;
}else{
pA->Close();
pB->Close();
return S_ERROR;
}
}
//Shouldn't be here!
return S_ERROR;
}

重构上面的代码,我们可以先分析一下上面的代码,说明了,上面的代码就是对 PeerA 和 PeerB 的两个状态 “连上”, “未连上” 做组合 “状态” (注:实际中的状态应该比这个还要复杂,可能还会有“断开”、“错误”……等等状态), 于是,我们可以把代码写成下面这样,合并上面的嵌套条件,对于每一种组合都做出判断。这样一来,逻辑就会非常的干净和清楚。

1
2
3
4
5
6
7
8
9
10
11
12
13
14
15
16
17
18
19
20
21
22
23
24
25
26
27
28
29
30
31
32
33
int ConnectPeer2Peer(Conn *pA, Conn* pB, Manager *manager)
{
if ( pA->isConnected() ) {
manager->Prepare(pA);
}

if ( pB->isConnected() ) {
manager->Prepare(pB);
}

// pA = YES && pB = NO
if (pA->isConnected() && ! pB->isConnected() ) {
pA->Write("Peer is not Ready, waiting");
return S_RETRY;
// pA = NO && pB = YES
}else if ( !pA->isConnected() && pB->isConnected() ) {
pB->Write("Peer is not Ready, waiting");
return S_RETRY;
// pA = YES && pB = YES
}else if (pA->isConnected() && pB->isConnected() ) {
if ( ! manager->ConnectTogther(pA, pB) ) {
return S_ERROR;
}
pA->Write("connected");
pB->Write("connected");
return S_OK;
}

// pA = NO, pB = NO
pA->Close();
pB->Close();
return S_ERROR;
}

延伸思考

对于 if-else 语句来说,一般来说,就是检查两件事:错误 和 状态。

检查错误

对于检查错误来说,使用 Guard Clauses 会是一种标准解,但我们还需要注意下面几件事:

1)当然,出现错误的时候,还会出现需要释放资源的情况。你可以使用 goto fail; 这样的方式,但是最优雅的方式应该是C++面向对象式的 RAII 方式。

2)以错误码返回是一种比较简单的方式,这种方式有很一些问题,比如,如果错误码太多,判断出错的代码会非常复杂,另外,正常的代码和错误的代码会混在一起,影响可读性。所以,在更为高组的语言中,使用try-catch异常捕捉的方式,会让代码更为易读一些。

检查状态

对于检查状态来说,实际中一定有更为复杂的情况,比如下面几种情况:

1)像TCP协议中的两端的状态变化。

2)像shell各个命令的命令选项的各种组合。

3)像游戏中的状态变化(一棵非常复杂的状态树)。

4)像语法分析那样的状态变化。

对于这些复杂的状态变化,其本上来说,你需要先定义一个状态机,或是一个子状态的组合状态的查询表,或是一个状态查询分析树。

写代码时,代码的运行中的控制状态或业务状态是会让你的代码流程变得混乱的一个重要原因,重构“箭头型”代码的一个很重要的工作就是重新梳理和描述这些状态的变迁关系。

总结

好了,下面总结一下,把“箭头型”代码重构掉的几个手段如下:

1)使用 Guard Clauses 。 尽可能的让出错的先返回, 这样后面就会得到干净的代码。

2)把条件中的语句块抽取成函数。 有人说:“如果代码不共享,就不要抽取成函数!”,持有这个观点的人太死读书了。函数是代码的封装或是抽象,并不一定用来作代码共享使用,函数用于屏蔽细节,让其它代码耦合于接口而不是细节实现,这会让我们的代码更为简单,简单的东西都能让人易读也易维护,写出让人易读易维护的代码才是重构代码的初衷!

3)对于出错处理,使用try-catch异常处理和RAII机制。返回码的出错处理有很多问题,比如:A) 返回码可以被忽略,B) 出错处理的代码和正常处理的代码混在一起,C) 造成函数接口污染,比如像atoi()这种错误码和返回值共用的糟糕的函数。

4)对于多个状态的判断和组合,如果复杂了,可以使用“组合状态表”,或是状态机加Observer的状态订阅的设计模式。这样的代码即解了耦,也干净简单,同样有很强的扩展性。

5) 重构“箭头型”代码其实是在帮你重新梳理所有的代码和逻辑,这个过程非常值得为之付出。重新整思路去想尽一切办法简化代码的过程本身就可以让人成长。

流式计算概述和Spark Streaming tips

Posted on 2017-04-10 | In Spark |

常规计算引擎分类

  1. 批处理
    • 高吞吐,低延迟
    • 面向静态数据集合的处理
    • 分钟甚至小时级别延迟
    • 比如MR, Spark
  2. 流式计算
    • 面向行级别数据处理
    • 毫秒级延迟
    • 比如storm

流式计算分类

  1. 面向行
    Apache Flink — 收集一堆数据,然后一行一行处理
    Storm
  2. 面向micro-Batch
    Spark Streaming — 收集一堆数据,然后一起处理

流式计算通用户环节

数据源 —> 数据缓存 —> 流式引擎 —> 结果存储

流式计算计算方式

  1. 固定窗口
    Spark Streaming 常规支持的方式
  2. 滑动窗口( window )

  3. 会话计算( mapWithStates )
    存储Spark Streaming的状态信息(类似session),可以进行过期处理

    Spark Streaming编程要点

Spark Streaming: exactly once delivery
特殊情况:故障重算,推测执行等

  1. Monitoring and managing jobs
  • where to run the driver?
    Yarn cluster mode. Driver will continue to running when the client machine goes down.
  • How to restart driver ?
    set up automatic restart.
    In spark configuration (e.g. spark-defaults.conf):
1
2
3
4
5
6
spark.yarn.maxAppAttempts=2  // 重试尝试次数
spark.yarn.am.attemptFailuresValidityInterval=1h // 重置尝试次数的时间
spark.yarn.max.executor.failures={8 * num_executors} // executor失败的最大次数
spark.yarn.executor.failuresValidityInterval=1h // 重置失败的时间
spark.task.maxFailures=8 // task重试次数 默认是4
spark.speculation=true //预测执行, 前提:task是幂等
  • Summary
    各种
    1
    2
    3
    4
    5
    6
    7
    8
    9
    10
    11
    12
    13
    14
    15
    16
    17
    18
    19
    20
    21
    22
    23
    2. Graceful shutting down your streaming app
    思路: Thread hooks – Check for an external flag every N seconds

    ``` scala
    /** * Stop the execution of the streams, with option of ensuring all received data
    * has been processed.
    *
    * * @param stopSparkContext if true, stops the associated SparkContext. The underlying SparkContext
    * will be stopped regardless of whether this StreamingContext has been
    * started.
    * @param stopGracefully if true, stops gracefully by waiting for the processing of all
    * received data to be completed
    */
    def stop(stopSparkContext: Boolean, stopGracefully: Boolean): Unit = {
    receiverTracker.stop(processAllReceivedData) //default is to wait 10 second, grace waits until done jobGenerator.stop(processAllReceivedData) // Will use spark.streaming.gracefulStopTimeout
    jobExecutor.shutdown()
    val terminated = if (processAllReceivedData) {
    jobExecutor.awaitTermination(1, TimeUnit.HOURS) // just a very large period of time
    } else {
    jobExecutor.awaitTermination(2, TimeUnit.SECONDS)
    }
    if (!terminated) { jobExecutor.shutdownNow()
    }

How to be graceful?
• cmd line
– $SPARK_HOME_DIR/bin/spark-submit –master $MASTER_REST_URL –kill $DRIVER_ID
– spark.streaming.stopGracefullyOnShutdown=true

1
2
3
4
5
private def stopOnShutdown(): Unit = { 
val stopGracefully = conf.getBoolean("spark.streaming.stopGracefullyOnShutdown", false)
logInfo(s"Invoking stop(stopGracefully=$stopGracefully) from shutdown hook")
// Do not stop SparkContext, let its own shutdown hook stop it
stop(stopSparkContext = false, stopGracefully = stopGracefully) }

• By marker file
– Touch a file when starting the app on HDFS
– Remove the file when you want to stop
– Separate thread in Spark app, calls

1
streamingContext.stop(stopSparkContext = true, stopGracefully = true)

Structured Streaming介绍

Posted on 2017-04-06 | In Spark |

中文入门编程指南

官方文档

Real-time Streaming ETL with Structured Streaming in Apache Spark 2.1

背景

Structured Streaming接口在社区2.0版本发布测试接口,主要暴露最初的设计思路及基本接口,不具备在生产环境使用的能力;2.1版本中Structured Streaming作为主要功能发布,支持Kafka数据源、基于event_time的window及watermark功能,虽然还在Alapha阶段,但从实现的完备程度及反馈来看已具备初步的功能需求。

设计理念及所解决的问题

从Spark 0.7版本发布DStream接口及Spark Streaming模块以来,Spark具备流式处理功能且在业界有了一系列应用,但依旧存在一些问题,诟病较多的是如下几点:

  • 不支持event_time,按照到达绝对时间切分records组成DStream的方式对很多场景不适合
  • 不支持流式window操作
  • 不支持watermark,无法对乱序数据做容错

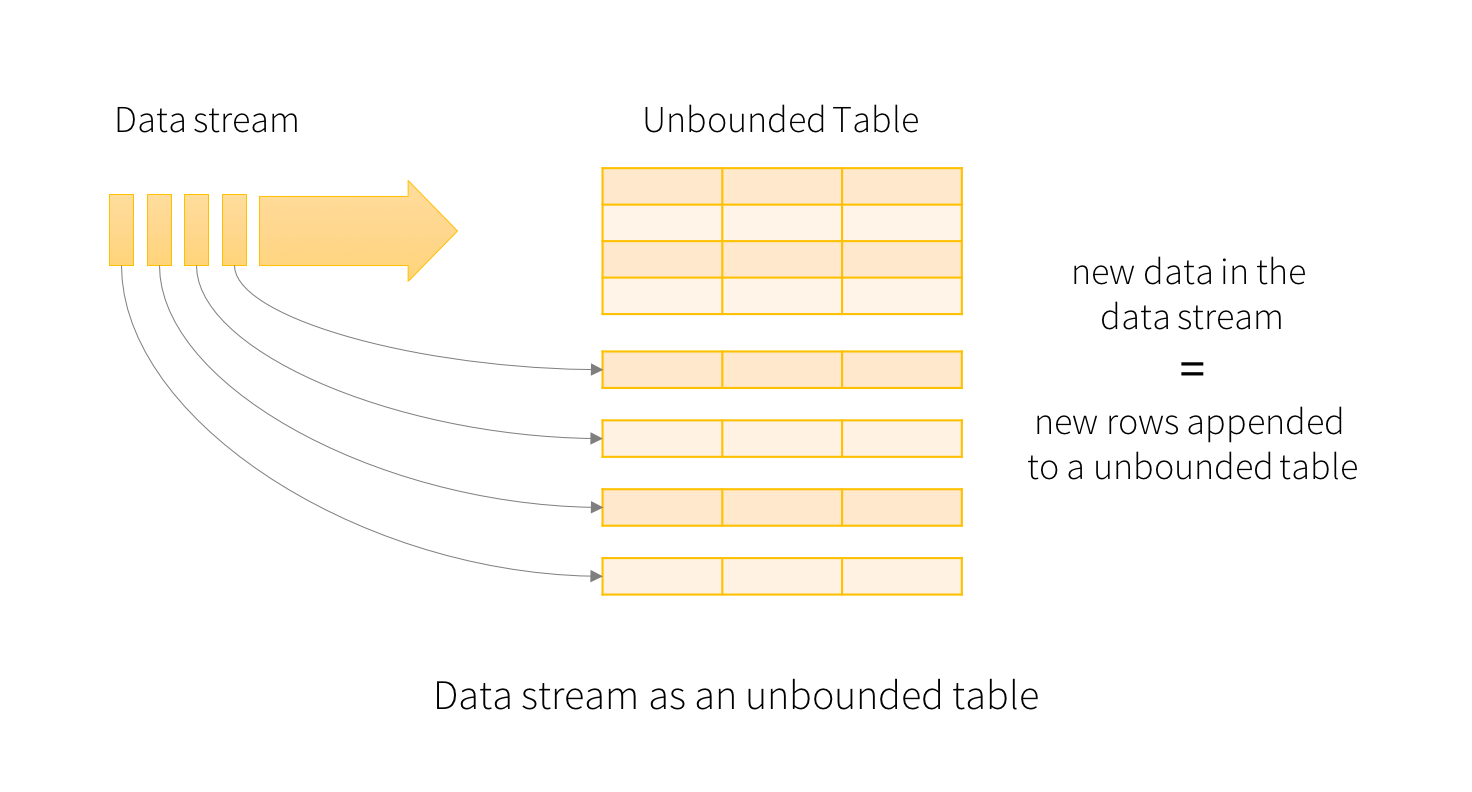
2.1版本的Spark不但解决上述问题,并将Spark Streaming的流处理方式和1.x版本中集中开发的SQL模块、DataFrame\DataSet API相融合,推出Structured Streaming引擎。其设计思路在于将持续不断的上游数据抽象为unbounded table,对流式的处理看作是表中不同部分的数据(complete\append\update mode)进行处理:

从代码层面看,Structured Streaming代码放在sql模块中,与原有SQL的datasource api、logical plan、physical plan做了诸多兼容操作,将流式处理的上游下游分别抽象为Source与Sink,基于DataFrame抽象出输入输出流DataStreamReader、DataStreamWriter。DataStreamReader中打通datasource api,支持多种上游的读取支持,DataStreamWriter中遵循惰性计算的思路实现多种触发操作及不同类型的写出模式。

Demo for struct streaming

一个完整的struct streaming示例及分布解释如下:

1
2
3
4
5
6
7
8
9
10
11
12
13
14
15
16
17
18
19
20
21
22
23
24
25
26
27
28
29
import org.apache.spark.sql.functions._
import org.apache.spark.sql.SparkSession

// 与其他spark作业一致,获取build spark session,对应旧版本中的spark context
val spark = SparkSession
.builder
.appName("StructuredNetworkWordCount")
.getOrCreate()

import spark.implicits._
// 创建一个基于stream source的dataframe

val lines = spark.readStream
.format("socket") # 对应基本概念:Source
.option("host", host)
.option("port", port)
.load()

// WordCount逻辑,与dataframe/dataset api用法完全一致,
val words = lines.as[String].flatMap(_.split(" "))
val wordCounts = words.groupBy("value").count()

// 调用dataset的writeStream创建写出流,设置对应的sink mode及类型
val query = wordCounts.writeStream
.outputMode("complete") # 对应基本概念:Output Mode
.format("console") # 对应基本概念:Sink
.start()

query.awaitTermination()

基本概念

Source

Struct Streaming的输入源,每种输入源对应自己的dataSource实现,当前支持如下三种Source:

  • File Source: 输入数据源为hdfs目录中的文件,天然支持的文件格式和dataset一致(json csv text parquet),将文件不断mv至指定目录中作为持续数据源
  • Kafka Source: 将kafka作为struct streaming source,目前支持的版本为0.10.0
  • Socket Source: 将socket输入数据作为streaming source,只用来做调试和demo使用

    Output Mode

    Output Mode都是对于每次trigger过后的result table而言的
  • Complete Mode : 从开始到目前为止的所有数据视为一张大表,query作用于整个表上的结果整体写入
  • Append Mode : 从上次trigger到目前为止,不会在发生变化的数据append到最终的sink端
  • Update Mode : 从上次trigger到目前为止,发生变化的条目写入到最终的sink端

简单用自带的StructuredNetworkWordCountWindowed实例对比下Complete mode与Update Mode:
数据输入:

1
2
3
4
[liyuanjian@MacBook~Pro ~]$ nc -l 9999
apache spark
apache hadoop
baidu inf spark

Complete mode output:

1
2
3
4
5
6
7
8
9
10
11
12
13
14
15
16
17
18
19
20
21
22
23
24
+------+-----+
| value|count|
+------+-----+
|apache| 1|
| spark| 1|
+------+-----+

+------+-----+
| value|count|
+------+-----+
|apache| 2|
|hadoop| 1|
| spark| 1|
+------+-----+

+------+-----+
| value|count|
+------+-----+
| baidu| 1|
|apache| 2|
|hadoop| 1|
| spark| 2|
| inf| 1|
+------+-----+

Update mode output:

1
2
3
4
5
6
7
8
9
10
11
12
13
14
15
16
17
18
19
20
21
+------+-----+
| value|count|
+------+-----+
|apache| 1|
| spark| 1|
+------+-----+

+------+-----+
| value|count|
+------+-----+
|apache| 2|
|hadoop| 1|
+------+-----+

+-----+-----+
|value|count|
+-----+-----+
|baidu| 1|
| inf| 1|
|spark| 2|
+-----+-----+

Sink

作为struct streaming的下游抽象,sink代表将最终处理完成的dataframe写出的方式,目前支持:

  1. File sink : 将数据写入hdfs目录,可以支持带partition的table写入
  2. Console sink : 将数据直接调用dataframe.show()打印在stdout,调试作用,demo中使用的都是console sink
  3. Memory sink : 将所有下游存储在driver的内存中,抽象为一张表,也只能做调试使用
  4. Foreach sink : 依赖用户实现ForeachWriter接口配合使用,foreach sink中对每次触发的dataframe,按逐个partition调用ForeachWriter的接口进行处理,可以实现ForeachWriter写入任何需要的下游存储或处理系统,接口如下:
    1
    2
    3
    4
    5
    6
    7
    8
    9
    10
    11
    12
    13
    14
    15
    16
    17
    18
    19
    20
    21
    22
    23
    24
    25
    26
    27
    28
    29
    30
    31
    32
    33
    34
    35
    36
    37
    abstract class ForeachWriter[T] extends Serializable {

    // TODO: Move this to org.apache.spark.sql.util or consolidate this with batch API.

    /**
    * Called when starting to process one partition of new data in the executor. The `version` is
    * for data deduplication when there are failures. When recovering from a failure, some data may
    * be generated multiple times but they will always have the same version.
    *
    * If this method finds using the `partitionId` and `version` that this partition has already been
    * processed, it can return `false` to skip the further data processing. However, `close` still
    * will be called for cleaning up resources.
    *
    * @param partitionId the partition id.
    * @param version a unique id for data deduplication.
    * @return `true` if the corresponding partition and version id should be processed. `false`
    * indicates the partition should be skipped.
    */
    def open(partitionId: Long, version: Long): Boolean

    /**
    * Called to process the data in the executor side. This method will be called only when `open`
    * returns `true`.
    */
    def process(value: T): Unit

    /**
    * Called when stopping to process one partition of new data in the executor side. This is
    * guaranteed to be called either `open` returns `true` or `false`. However,
    * `close` won't be called in the following cases:
    * - JVM crashes without throwing a `Throwable`
    * - `open` throws a `Throwable`.
    *
    * @param errorOrNull the error thrown during processing data or null if there was no error.
    */
    def close(errorOrNull: Throwable): Unit
    }

Window

和其他流式系统一样,基于滑动时间窗的数据统计、聚合是必不可少的需求,2.1实现了基于event-time的window定义,接口如下:

1
2
3
4
5
6
7
8
9
10
11
12
13
14
15
16
17
18
19
20
21
22
23
24
25
26
27
28
29
30
31
32
33
34
35
36
37
38
39
40
41
42
43
44
45
46
/**
* Bucketize rows into one or more time windows given a timestamp specifying column. Window
* starts are inclusive but the window ends are exclusive, e.g. 12:05 will be in the window
* [12:05,12:10) but not in [12:00,12:05). Windows can support microsecond precision. Windows in
* the order of months are not supported. The windows start beginning at 1970-01-01 00:00:00 UTC.
* The following example takes the average stock price for a one minute window every 10 seconds:
*
* {{{
* val df = ... // schema => timestamp: TimestampType, stockId: StringType, price: DoubleType
* df.groupBy(window($"time", "1 minute", "10 seconds"), $"stockId")
* .agg(mean("price"))
* }}}
*
* The windows will look like:
*
* {{{
* 09:00:00-09:01:00
* 09:00:10-09:01:10
* 09:00:20-09:01:20 ...
* }}}
*
* For a streaming query, you may use the function `current_timestamp` to generate windows on
* processing time.
*
* @param timeColumn The column or the expression to use as the timestamp for windowing by time.
* The time column must be of TimestampType.
* @param windowDuration A string specifying the width of the window, e.g. `10 minutes`,
* `1 second`. Check [[org.apache.spark.unsafe.types.CalendarInterval]] for
* valid duration identifiers. Note that the duration is a fixed length of
* time, and does not vary over time according to a calendar. For example,
* `1 day` always means 86,400,000 milliseconds, not a calendar day.
* @param slideDuration A string specifying the sliding interval of the window, e.g. `1 minute`.
* A new window will be generated every `slideDuration`. Must be less than
* or equal to the `windowDuration`. Check
* [[org.apache.spark.unsafe.types.CalendarInterval]] for valid duration
* identifiers. This duration is likewise absolute, and does not vary
* according to a calendar.
*
* @group datetime_funcs
* @since 2.0.0
*/
@Experimental
@InterfaceStability.Evolving
def window(timeColumn: Column, windowDuration: String, slideDuration: String): Column = {
window(timeColumn, windowDuration, slideDuration, "0 second")
}

window通常与groupBy算子连用,通过设置dataframe中的timeColumn,windowDuration(window大小),sildeDuration(步长),来定义整个window的行为,如windowDuration = 10min, slideDuration = 5min,则代表由event-time触发每5分钟计算一次,计算的对象是当前window中10min的数据

Watermark

接上述window的介绍,对于任何基于window\event-time的聚合场景,我们都需要考虑对于乱序的过期event-time数据到达的处理行为。watermark用来给用户提供一个接口,让用户能够定义”比当前处理时间慢多久的数据可以丢弃,不再处理”,祥设文档参见:https://docs.google.com/document/d/1z-Pazs5v4rA31azvmYhu4I5xwqaNQl6ZLIS03xhkfCQ/edit#heading=h.yx3tjr1mrnl2

  • watermark的计算规则
  1. 在每次trigger触发计算时,先找到trigger data中的最大(近)event-time
  2. trigger结束后, new watermark = MAX(event-time before trigger, max event-time in trigger[步骤1]) - threashold
    watermark的限制
    watermark操作只能在logical plan中有一个,而且只能应用在从sink出发的单child关系链,简单理解就是处理不了复杂的多留join、union的各自设置watermark

如何在Spark平台搭建ThriftServer

Posted on 2017-03-30 | In Spark |

Thrift JDBC Server描述

Thrift JDBC Server使用的是HIVE0.12的HiveServer2实现。能够使用Spark或者hive0.12版本的beeline脚本与JDBC Server进行交互使用。Thrift JDBC Server默认监听端口是10000。

使用Thrift JDBC Server前需要注意:

1、将

1
2
3
4
5
6
7
8
9
10
11
12
13
14
15
16
17
18
19
20
21
22
23
24
25
26
27
28
29
30
31
32
33
34

说明: hive-site.xml配置有meta信息存储的MySQL路径

2、需要在$SPARK_HOME/conf/spark-env.sh中的SPARK_CLASSPATH添加jdbc驱动的jar包
export SPARK_CLASSPATH=$SPARK_CLASSPATH:/home/hadoop/software/mysql-connector-java-5.1.27-bin.jar


## Thrift JDBC Server/beeline启动

1. 启动Thrift JDBC Server:默认端口是10000

cd $SPARK_HOME/sbin
start-thriftserver.sh
> 如何修改Thrift JDBC Server的默认监听端口号?借助于--hiveconf
start-thriftserver.sh --hiveconf hive.server2.thrift.port=14000

Demo:

``` shell

#!/bin/bash

./sbin/start-thriftserver.sh \
--hiveconf hive.exec.mode.local.auto=true \
--hiveconf hive.auto.convert.join=true \
--hiveconf hive.mapjoin.smalltable.filesize=50000000 \
--name thriftserver \
--master yarn-client \
--driver-cores 5 \
--driver-memory 5G \
--conf spark.serializer=org.apache.spark.serializer.KryoSerializer \
--conf spark.scheduler.mode=FAIR \
--conf spark.kryoserializer.buffer.max.mb=1024 \
--conf spark.storage.memoryFraction=0.2

  1. 启动beeline
    cd $SPARK_HOME/bin
    beeline -u jdbc:hive2://hadoop000:10000

Demo:

$ ./bin/beeline
Beeline version 1.2.1.spark2 by Apache Hive
beeline> !connect jdbc:hive2://localhost:10000

Scala代码规范

Posted on 2017-03-29 | In Scala |

格式与命名

1) 代码格式
用两个空格缩进。避免每行长度超过100列。在两个方法、类、对象定义之间使用一个空白行。

2) 优先考虑使用val,而非var。

3) 当引入多个包时,使用花括号:

1
import jxl.write.{WritableCell, Number, Label}

当引入的包超过6个时,应使用通配符_:

1
import org.scalatest.events._

4) 若方法暴露为接口,则返回类型应该显式声明。例如:

1
2
3
4
5
6
def execute(conn: Connection): Boolean = {
executeCommand(conn, sqlStatement) match {
case Right(result) => result
case Left(_) => false
}
}

5) 集合的命名规范
xs, ys, as, bs等作为某种Sequence对象的名称;
x, y, z, a, b作为sequence元素的名称。
h作为head的名称,t作为tail的名称。

6) 避免对简单的表达式采用花括号;

1
2
3
4
5
6
7
//suggestion
def square(x: Int) = x * x

//avoid
def square(x: Int) = {
x * x
}

7) 泛型类型参数的命名虽然没有限制,但建议遵循如下规则:
A 代表一个简单的类型,例如List[A]
B, C, D 用于第2、第3、第4等类型。例如:
class List[A] {
def mapB: List[B] = …
}
N 代表数值类型

注意:在Java中,通常以K、V代表Map的key与value,但是在Scala中,更倾向于使用A、B代表Map的key与value。

语法特性

1) 定义隐式类时,应该将构造函数的参数声明为val。

2) 使用for表达式;如果需要条件表达式,应将条件表达式写到for comprehension中:

1
2
3
4
5
6
7
8
9
10
11
12
13
//not good
for (file <- files) {
if (hasSoundFileExtension(file) && !soundFileIsLong(file)) {
soundFiles += file
}
}

//better
for {
file <- files
if hasSoundFileExtension(file)
if !soundFileIsLong(file)
} yield file

通常情况下,我们应优先考虑filter, map, flatMap等操作,而非for comprehension:

1
2
//best
files.filter(hasSourceFileExtension).filterNot(soundFileIsLong)

3) 避免使用isInstanceOf,而是使用模式匹配,尤其是在处理比较复杂的类型判断时,使用模式匹配的可读性更好。

1
2
3
4
5
6
7
8
//avoid
if (x.isInstanceOf[Foo]) { do something …

//suggest
def isPerson(x: Any): Boolean = x match {
case p: Person => true
case _ => false
}

4) 以下情况使用abstract class,而不是trait:

  • 想要创建一个需要构造函数参数的基类
  • 代码可能会被Java代码调用

5) 如果希望trait只能被某个类(及其子类)extend,应该使用self type:

1
2
3
trait MyTrait {
this: BaseType =>
}

如果希望对扩展trait的类做更多限制,可以在self type后增加更多对trait的混入:

1
2
3
4
5
6
7
8
9
10
11
12
13
14
trait WarpCore {
this: Starship with WarpCoreEjector with FireExtinguisher =>
}

// this works
class Enterprise extends Starship
with WarpCore
with WarpCoreEjector
with FireExtinguisher

// won't compile
class Enterprise extends Starship
with WarpCore
with WarpCoreEjector

如果要限制扩展trait的类必须定义相关的方法,可以在self type中定义方法,这称之为structural type(类似动态语言的鸭子类型):

1
2
3
4
5
6
7
8
9
10
11
12
13
trait WarpCore {
this: {
def ejectWarpCore(password: String): Boolean
def startWarpCore: Unit
} =>
}

class Starship
class Enterprise extends Starship with WarpCore {
def ejectWarpCore(password: String): Boolean = {
if (password == "password") { println("core ejected"); true } else false }
def startWarpCore { println("core started") }
}

6) 对于较长的类型名称,在特定上下文中,以不影响阅读性和表达设计意图为前提,建议使用类型别名,它可以帮助程序变得更简短。例如:

1
2
3
4
class ConcurrentPool[K, V] {
type Queue = ConcurrentLinkedQueue[V]
type Map = ConcurrentHashMap[K, Queue]
}

7) 如果要使用隐式参数,应尽量使用自定义类型作为隐式参数的类型,而避免过于宽泛的类型,如String,Int,Boolean等。

1
2
3
4
5
6
7
8
9
10
11
12
13
14
15
16
//suggestion
def maxOfList[T](elements: List[T])
(implicit orderer: T => Ordered[T]): T =
elements match {
case List() =>
throw new IllegalArgumentException("empty list!")
case List(x) => x
case x :: rest =>
val maxRest = maxListImpParm(rest)(orderer)
if (orderer(x) > maxRest) x
else maxRest
}

//avoid
def maxOfListPoorStyle[T](elements: List[T])
(implicit orderer: (T, T) => Boolean): T

8) 对于异常的处理,Scala除了提供Java风格的try…catch…finally之外,还提供了allCatch.opt、Try…Success…Failure以及Either…Right…Left等风格的处理方式。其中,Try是2.10提供的语法。根据不同的场景选择不同风格:

  • 优先选择Try风格。Try很好地支持模式匹配,它兼具Option与Either的特点,因而既提供了集合的语义,又支持模式匹配,又提供了getOrElse()方法。同时,它还可以组合多个Try,并支持运用for combination。例如:

    1
    2
    3
    4
    5
    val z = for {
    a <- Try(x.toInt)
    b <- Try(y.toInt)
    } yield a * b
    val answer = z.getOrElse(0) * 2
  • 如果希望清楚的表现非此即彼的特性,应考虑使用Either。注意,约定成俗下,我们习惯将正确的结果放在Either的右边(Right既表示右边,又表示正确)

  • 如果希望将异常情况处理为None,则应考虑使用allCatch.opt。例如:

    1
    2
    3
    4
    import scala.util.control.Exception._

    def readTextFile(f: String): Option[List[String]] =
    allCatch.opt(Source.fromFile(f).getLines.toList)
  • 如果希望在执行后释放资源,从而需要使用finally时,考虑try…catch…finally,或者结合try…catch…finally与Either。例如:

    1
    2
    3
    4
    5
    6
    7
    8
    9
    10
    11
    12
    13
    14
    15
    16
    17
    18
    19
    20
    21
    private def executeQuery(conn: Connection, sql: String): Either[SQLException, ResultSet] = {
    var stmt: Statement = null
    var rs: ResultSet = null
    try {
    stmt = conn.createStatement()
    rs = stmt.executeQuery(sql)
    Right(rs)
    } catch {
    case e: SQLException => {
    e.printStackTrace()
    Left(e)
    }
    } finally {
    try {
    if (rs != null) rs.close()
    if (stmt != null) stmt.close()
    } catch {
    case e: SQLException => e.printStackTrace()
    }
    }
    }

为避免重复,还应考虑引入Load Pattern。

编码模式

1) Loan Pattern: 确保打开的资源(如文件、数据库连接)能够在操作完毕后被安全的释放。

Loan Pattern的通用格式如下:

1
2
3
4
5
6
def using[A](r : Resource)(f : Resource => A) : A =
try {
f(r)
} finally {
r.dispose()
}

这个格式针对Resource类型进行操作。还有一种做法是:只要实现了close方法,都可以运用Loan Pattern:

1
2
3
4
5
6
def using[A <: def close():Unit, B][resource: A](f: A => B): B = 
try {
f(resource)
} finally {
resource.close()
}

以FileSource为例:

1
2
3
4
5
6
7
using(io.Source.fromFile("example.txt")) { 
source => {
for (line <- source.getLines) {
println(line)
}
}
}

2) Cake Pattern: 利用self type实现依赖注入

例如,对于DbAccessor而言,需要提供不同的DbConnectionFactory来创建连接,从而访问不同的Data Source。

1
2
3
4
5
6
trait DbConnectionFactory {
def createDbConnection: Connection
}

trait SybaseDbConnectionFactory extends DbConnectionFactory…
trait MySQLDbConnectionFactory extends DbConnectionFactory…

运用Cake Pattern,DbAccessor的定义应该为:

1
2
3
4
5
trait DbAccessor {
this: DbConnectionFactory =>

//…
}

由于DbAccessor使用了self type,因此可以在DbAccessor中调用DbConnectionFactory的方法createDbConnection()。客户端在创建DbAccessor时,可以根据需要选择混入的DbConnectionFactory:

1
val sybaseDbAccessor = new DbAccessor with SybaseDbConnectionFactory

当然,也可以定义object:

1
2
object SybaseDbAccessor extends DbAccessor with SybaseDbConnectionFactory
object MySQLDbAccessor extends DbAccessor with MySQLDbConnectionFactory

编码风格

1) 尽可能直接在函数定义的地方使用模式匹配。例如,在下面的写法中,match应该被折叠起来(collapse):

1
2
3
4
5
6
list map { item =>   
item match {
case Some(x) => x
case None => default
}
}

用下面的写法替代:

1
2
3
4
list map {
case Some(x) => x
case None => default
}

它很清晰的表达了 list中的元素都被映射,间接的方式让人不容易明白。此时,传入map的函数实则为partial function。

2) 避免使用null,而应该使用Option的None。

1
2
3
4
5
6
7
8
9
10
11
12
13
14
15
16
17
18
19
20
import java.io._

object CopyBytes extends App {
var in = None: Option[FileInputStream]
var out = None: Option[FileOutputStream]
try {
in = Some(new FileInputStream("/tmp/Test.class"))
out = Some(new FileOutputStream("/tmp/Test.class.copy"))
var c = 0
while ({c = in.get.read; c != −1}) {
out.get.write(c)
}
} catch {
case e: IOException => e.printStackTrace
} finally {
println("entered finally ...")
if (in.isDefined) in.get.close
if (out.isDefined) out.get.close
}
}

方法的返回值也要避免返回Null。应考虑返回Option,Either,或者Try。例如:

1
2
3
4
5
6
7
8
9
10
11
import scala.util.{Try, Success, Failure} 

def readTextFile(filename: String): Try[List[String]] = {
Try(io.Source.fromFile(filename).getLines.toList
)

val filename = "/etc/passwd"
readTextFile(filename) match {
case Success(lines) => lines.foreach(println)
case Failure(f) => println(f)
}

3) 若在Class中需要定义常量,应将其定义为val,并将其放在该类的伴生对象中:

1
2
3
4
5
6
7
8
9
10
11
12
13
14
15
16
17
18
19
class Pizza (var crustSize: Int, var crustType: String) {
def this(crustSize: Int) {
this(crustSize, Pizza.DEFAULT_CRUST_TYPE)
}

def this(crustType: String) {
this(Pizza.DEFAULT_CRUST_SIZE, crustType)
}

def this() {
this(Pizza.DEFAULT_CRUST_SIZE, Pizza.DEFAULT_CRUST_TYPE)
}
override def toString = s"A $crustSize inch pizza with a $crustType crust"
}

object Pizza {
val DEFAULT_CRUST_SIZE = 12
val DEFAULT_CRUST_TYPE = "THIN"
}

4) 合理为构造函数或方法提供默认值。例如:

1
class Socket (val timeout: Int = 10000)

5) 如果需要返回多个值时,应返回tuple。

1
2
3
4
def getStockInfo = {
//
("NFLX", 100.00, 101.00)
}

6) 作为访问器的方法,如果没有副作用,在声明时建议定义为没有括号。

例如,Scala集合库提供的scala.collection.immutable.Queue中,dequeue方法没有副作用,声明时就没有括号:

1
2
3
4
import scala.collection.immutable.Queue

val q = Queue(1, 2, 3, 4)
val value = q.dequeue

7) 将包的公有代码(常量、枚举、类型定义、隐式转换等)放到package object中。

1
2
3
4
5
6
7
8
9
10
11
12
13
14
15
16
17
18
19
package com.agiledon.myapp

package object model {
// field
val MAGIC_NUM = 42 182 | Chapter 6: Objects

// method
def echo(a: Any) { println(a) }

// enumeration
object Margin extends Enumeration {
type Margin = Value
val TOP, BOTTOM, LEFT, RIGHT = Value
}

// type definition
type MutableMap[K, V] = scala.collection.mutable.Map[K, V]
val MutableMap = scala.collection.mutable.Map
}

8) 建议将package object放到与包对象命名空间一致的目录下,并命名为package.scala。以model为例,package.scala文件应放在:
+– com
+– agiledon
+– myapp
+– model
+– package.scala

9) 若有多个样例类属于同一类型,应共同继承自一个sealed trait。

1
2
3
sealed trait Message
case class GetCustomers extends Message
case class GetOrders extends Message

注:这里的sealed,表示trait的所有实现都必须声明在定义trait的文件中。

10) 考虑使用renaming clause来简化代码。例如,替换被频繁使用的长名称方法:

1
2
3
4
import System.out.{println => p}

p("hallo scala")
p("input")

11) 在遍历Map对象或者Tuple的List时,且需要访问map的key和value值时,优先考虑采用Partial Function,而非使用_1和_2的形式。例如:

1
2
3
4
5
6
7
8
9
val dollar = Map("China" -> "CNY", "US" -> "DOL")

//perfer
dollar.foreach {
case (country, currency) => println(s"$country -> $currency")
}

//avoid
dollar.foreach ( x => println(s"$x._1 -> $x._2") )

或者,考虑使用for comprehension:

1
for ((country, currency) <- dollar) println(s"$country -> $currency")

12) 遍历集合对象时,如果需要获得并操作集合对象的下标,不要使用如下方式:

1
2
3
val l = List("zero", "one", "two", "three")

for (i <- 0 until l.length) yield (i, l(i))

而应该使用zipWithIndex方法:

1
for ((number, index) <- l.zipWithIndex) yield (index, number)

或者:

1
l.zipWithIndex.map(x => (x._2, x._1))

当然,如果需要将索引值放在Tuple的第二个元素,就更方便了。直接使用zipWithIndex即可。

zipWithIndex的索引初始值为0,如果想指定索引的初始值,可以使用zip:

1
l.zip(Stream from 1)

13) 应尽量定义小粒度的trait,然后再以混入的方式继承多个trait。例如ScalaTest中的FlatSpec:

1
2
3
class FlatSpec extends FlatSpecLike ...

trait FlatSpecLike extends Suite with ShouldVerb with MustVerb with CanVerb with Informing …

小粒度的trait既有利于重用,同时还有利于对业务逻辑进行单元测试,尤其是当一部分逻辑需要依赖外部环境时,可以运用“关注点分离”的原则,将不依赖于外部环境的逻辑分离到单独的trait中。

14) 优先使用不可变集合。如果确定要使用可变集合,应明确的引用可变集合的命名空间。不要用使用import scala.collection.mutable._;然后引用 Set,应该用下面的方式替代:

1
2
import scala.collections.mutable
val set = mutable.Set()

这样更明确在使用一个可变集合。

15) 在自己定义的方法和构造函数里,应适当的接受最宽泛的集合类型。通常可以归结为一个: Iterable, Seq, Set, 或 Map。如果你的方法需要一个 sequence,使用 Seq[T],而不是List[T]。这样可以分离集合与它的实现,从而达成更好的可扩展性。

16) 应谨慎使用流水线转换的形式。当流水线转换的逻辑比较复杂时,应充分考虑代码的可读性,准确地表达开发者的意图,而不过分追求函数式编程的流水线转换风格。例如,我们想要从一组投票结果(语言,票数)中统计不同程序语言的票数并按照得票的顺序显示:

1
2
3
4
5
6
7
8
val votes = Seq(("scala", 1), ("java", 4), ("scala", 10), ("scala", 1), ("python", 10))
val orderedVotes = votes
.groupBy(_._1)
.map { case (which, counts) =>
(which, counts.foldLeft(0)(_ + _._2))
}.toSeq
.sortBy(_._2)
.reverse

上面的代码简洁并且正确,但几乎每个读者都不好理解作者的原本意图。一个策略是声明中间结果和参数:

1
2
3
4
5
6
7
8
9
val votesByLang = votes groupBy { case (lang, _) => lang }
val sumByLang = votesByLang map {
case (lang, counts) =>
val countsOnly = counts map { case (_, count) => count }
(lang, countsOnly.sum)
}
val orderedVotes = sumByLang.toSeq
.sortBy { case (_, count) => count }
.reverse

代码也同样简洁,但更清晰的表达了转换的发生(通过命名中间值),和正在操作的数据的结构(通过命名参数)。

17) 对于Options对象,如果getOrElse能够表达业务逻辑,就应避免对其使用模式匹配。许多集合的操作都提供了返回Options的方法。例如headOption等。

1
val x = list.headOption getOrElse 0

这要比模式匹配更清楚:

1
2
3
val x = list match 
case head::_ => head
case Nil: => 0

18) 当需要对两个或两个以上的集合进行操作时,应优先考虑使用for表达式,而非map,flatMap等操作。此时,for comprehension会更简洁易读。例如,获取两个字符的所有排列,相同的字符不能出现两次。使用flatMap的代码为:

1
2
3
4
5
6
7
val chars = 'a' to 'z'
val perms = chars flatMap { a =>
chars flatMap { b =>
if (a != b) Seq("%c%c".format(a, b))
else Seq()
}
}

使用for comprehension会更易懂:

1
2
3
4
5
6
7
8
9
10
11
12
13
14
15
16
17
18
19
 val perms = for {
a <- chars
b <- chars
if a != b
} yield "%c%c".format(a, b)
```


## 高效编码

1) 应尽量避免让trait去extend一个class。因为这种做法可能会导致间接的继承多个类,从而产生编译错误。同时,还会导致继承体系的复杂度。
```scala
class StarfleetComponent
trait StarfleetWarpCore extends StarfleetComponent
class Starship extends StarfleetComponent with StarfleetWarpCore
class RomulanStuff

// won't compile
class Warbird extends RomulanStuff with StarfleetWarpCore

2) 选择使用Seq时,若需要索引下标功能,优先考虑选择Vector,若需要Mutable的集合,则选择ArrayBuffer;
若要选择Linear集合,优先选择List,若需要Mutable的集合,则选择ListBuffer
。

3) 如果需要快速、通用、不变、带顺序的集合,应优先考虑使用Vector。Vector很好地平衡了快速的随机选择和快速的随机更新(函数式)操作。Vector是Scala集合库中最灵活的高效集合。一个原则是:当你对选择集合类型犹疑不定时,就应选择使用Vector。

需要注意的是:当我们创建了一个IndexSeq时,Scala实际上会创建Vector对象:

1
2
scala> val x = IndexedSeq(1,2,3)
x: IndexedSeq[Int] = Vector(1, 2, 3)

4) 如果需要选择通用的可变集合,应优先考虑使用ArrayBuffer。尤其面对一个大的集合,且新元素总是要添加到集合末尾时,就可以选择ArrayBuffer。如果使用的可变集合特性更近似于List这样的线性集合,则考虑使用ListBuffer。

5) 如果需要将大量数据添加到集合中,建议选择使用List的prepend操作,将这些数据添加到List头部,最后做一次reverse操作。例如:

1
2
3
4
5
var l = List[Int]()
(1 to max).foreach {
i => i +: l
}
l.reverse

6) 当一个类的某个字段在获取值时需要耗费资源,并且,该字段的值并非一开始就需要使用。则应将该字段声明为lazy。

1
lazy val field = computation()

7) 在使用Future进行并发处理时,应使用回调的方式,而非阻塞:

1
2
3
4
5
6
7
8
9
10
11
12
13
14
15
//avoid
val f = Future {
//executing long time
}

val result = Await.result(f, 5 second)

//suggesion
val f = Future {
//executing long time
}
f.onComplete {
case Success(result) => //handle result
case Failure(e) => e.printStackTrace
}

8) 若有多个操作需要并行进行同步操作,可以选择使用par集合。例如:

1
2
3
4
5
6
7
8
9
val urls = List("http://scala-lang.org",
"http://agiledon.github.com")

def fromURL(url: String) = scala.io.Source.fromURL(url)
.getLines().mkString("\n")

val t = System.currentTimeMillis()
urls.par.map(fromURL(_))
println("time: " + (System.currentTimeMillis - t) + "ms")

9) 若有多个操作需要并行进行异步操作,则采用for comprehension对future进行join方式的执行。例如,假设Cloud.runAlgorithm()方法返回一个Futrue[Int],可以同时执行多个runAlgorithm方法:

1
2
3
4
5
6
7
8
9
10
11
12
13
val result1 = Cloud.runAlgorithm(10)
val result2 = Cloud.runAlgorithm(20)
val result3 = Cloud.runAlgorithm(30)

val result = for {
r1 <- result1
r2 <- result2
r3 <- result3
} yield (r1 + r2 + r3)

result onSuccess {
case result => println(s"total = $result")
}

测试

1) 测试类应该与被测试类处于同一包下。如果使用Spec2或ScalaTest的FlatSpec等,则测试类的命名应该为:被测类名 + Spec;若使用JUnit等框架,则测试类的命名为:被测试类名 + Test

2) 测试含有具体实现的trait时,可以让被测试类直接继承Trait。例如:

1
2
3
4
5
6
7
8
9
10
11
12
13
trait RecordsGenerator {
def generateRecords(table: List[List[String]]): List[Record] {
//...
}
}

class RecordsGeneratorSpec extends FlatSpec with ShouldMatcher with RecordGenerator {
val table = List(List("abc", "def"), List("aaa", "bbb"))
it should "generate records" in {
val records = generateRecords(table)
records.size should be(2)
}
}

3) 若要对文件进行测试,可以用字符串假装文件:

1
2
3
4
type CsvLine = String
def formatCsv(source: Source): List[CsvLine] = {
source.getLines(_.replace(", ", "|"))
}

formatCsv需要接受一个文件源,例如Source.fromFile(“testdata.txt”)。但在测试时,可以通过Source.fromString方法来生成formatCsv需要接收的Source对象:

1
2
3
4
5
it should "format csv lines" in {
val lines = Source.fromString("abc, def, hgi\n1, 2, 3\none, two, three")
val result = formatCsv(lines)
result.mkString("\n") should be("abc|def|hgi\n1|2|3\none|two|three")
}

1…345…11

Sun Ke

104 posts
21 categories
61 tags
© 2018 Sun Ke
Powered by Hexo
|
Theme — NexT.Pisces v5.1.4